How to Make Hash

In This Article
First Things First: What is Hash?
How to Make Finger Hash: Also Called Hand Hash or Charas
How to Make Dry Ice Hash
How to Make Hash from Kief
Temple balls and the Frenchy Cannoli Hot Water Bottle Method
How to Make Bubble Hash: Or How to Make Ice Water Hash
How to Make Dry Sift Hash
How to Make Hash Rosin
How to Smoke Hash
First Things First: What is Hash?
Before we learn how to make hash, we need learn what it is.
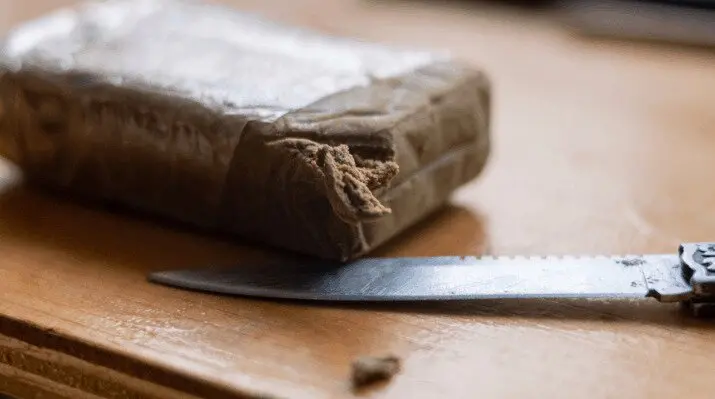
In the simplest possible terms, hash is a cannabis concentrate. That puts it in the same category as dabs and wax, but it’s made without the use of solvents or chemicals. Essentially, hash is made by extracting and processing the resin glands – called trichomes – of the cannabis plant. Usually, after extraction, these glands are then treated with heat and pressure to create a sticky, fragrant substance – that’s what we call hashish.
It can be made in a ton of different ways, some extremely complex and requiring expensive equipment and materials, and some requiring nothing but a pair of gloves and a little elbow grease.
Some hash is pure enough to be considered “full melt,” meaning it completely liquifies when heat is applied – that means it can be dabbed in a rig just like solvent concentrates. Some other forms will burn candescently, similar to charcoal or incense, and are usually smoked in a pipe or bong.
High-quality hash is characterized by fantastic flavor and texture, but most importantly it must contain as little plant material as possible – we’re looking for pure trichomes and nothing else. Lower-grade hash will often have a greenish tint, as it contains residual stalk or leaf materials.
Either way, you’re in for a treat – hash is considered by many to be the most delicious form of cannabis, and when you get (or make!) some great quality hash, there are few smoking experiences that can rival it.
Let’s take a look at the different types of hash, and how to make them yourself.
How to Make Finger Hash: Also Called Hand Hash or Charas

Finger hash, sometimes known as hand hash, and referred to as charas in India, is probably the simplest, and oldest, way to make hash. The process is not complicated, but takes time, care and patience.
To make finger hash at home, all you need to do is gently rub live cannabis buds between your hands. By live, we mean still living – this process, unlike other methods, is carried out before the plant has been cultivated, dried or cured. In fact, it’s done while the plant is still in the soil!
The slower and more gently this process is done, the higher quality the hash will be. That said, the process of making finger hash couldn’t be simpler. You don’t need any equipment at all, though some prefer to cultivate it while wearing disposable gloves – that way your hands don’t get sticky.

Charas, or finger hash, is traditionally smoked in a chillum, which is a type of one-hitter pipe first produced by Indian artisans. It can also easily be smoked in a pipe or bong, or mixed with ground flower or tobacco and rolled into a joint.
While it’s mostly associated with India, charas is also traditionally prepared in Nepal.
How to Make Dry Ice Hash

Time to explore a more modern method – let’s learn how to make dry ice hash.
Like the name implies, dry ice hash is created by processing cannabis with dry ice (solid C02). The low temperature freezes the cannabis, making it easier for the trichomes (resin glands) to separate from the plant material.
According to the gurus at GrowWeedEasy, the dry ice method is the best way to make hash at home.
Here’s what you’ll need to get started making dry ice hash:
- Hash extraction bags in 73, 160 and 220 micron sizes. These are also used for bubble hash.
- Dry ice (duh)
- A 5-gallon bucket
- Thick, cold-resistant gloves – like snowboarding or BBQ gloves
- A large, smooth surface – like a sheet of plexiglass
- An unused credit card or paint scraper
- Of course – cannabis bud or trim!
Some considerations before you get started – be careful handling dry ice, and make sure your workspace is well ventilated. To dispose of your dry ice when you’re done, just leave it outside or in a well-ventilated area – it’ll dissipate into gas on its own.
The process itself might seem a bit intimidating, but it’s easier than you think. Here’s a step-by-step breakdown:
- Add ground cannabis (or trim) and your dry ice to the bucket. Nothing special here, just make sure your material is well-ground – ideally with a weed grinder in order to get the right consistency. 3lbs of dry ice is sufficient for processing up to 6oz of starting material.
- Fit one of the hash bags over the rim of the bucket. The micron size you use will determine the quality and yield of your hash. To get the best possible yield, use all three bag sizes we mentioned in ascending order (starting with 73 and finishing with 220). If you only want the very best hash, skip the 220 and maybe even the 160.
- Shake and swirl your bucket around – this process is what separates the trichomes from the plant material. As the bud or trim moves around with the dry ice, the trichomes start to freeze and fall off. You’ll want to swirl and shake it for about 3-5 minutes, but a little trial and error will show you what gives the best yields for your starter material.
- Invert the bucket and bag, letting all the material fall into the bag itself. You’ll want to do this over your flat surface to catch anything that falls through the screen of the bag.
- Shake that thing! With all of your material collected in the hash bag, you can carefully remove it from the bucket and start shaking it up and down over your flat surface. You’ll see particles start to fall out of the bag and collect on your surface. Keep shaking until nothing is falling out of the bag anymore – this might take 5 or 10 minutes.
- You’re done! If you’re using multiple micron size bags, repeat steps 2-5 in ascending micron size – meaning your first pass was with 73 micron, your second with 160 and your final with 220.
Congratulations – you just made dry ice hash from scratch. Go ahead and add some to a bowl or joint to enjoy the fruits of your labor. Your 220 micron hash might even be pure enough to dab it in a rig or vaporizer.
How to Make Hash from Kief

Got some kief building up in your grinder or stash box? Don’t throw it away – there’s a lot you can do with it!
Many of the methods mentioned here will work with kief – you can make finger hash with kief by simply rubbing it between your hands, and you can also press it into rosin. But the simplest, and arguably the best, method for processing kief into hash is what’s called the hot water bottle method – sometimes also called making temple balls.
Temple balls and the Frenchy Cannoli Hot Water Bottle Method
The true artisan’s approach to charas involves making what are called temple balls. This top-shelf hash is prized by many as the single most exquisite form of cannabis concentrate in the world.
While the original Nepalese temple ball method is mostly a lost art, a slightly more modern method was pioneered by Frenchy Cannoli, involving heating resin glands gently with a glass bottle filled with hot, almost-boiling, water. Frenchy is one of the true masters of hashish in the world today, blending traditional methods with updated materials and techniques.
We could write a whole article on Frenchy and his artisanal techniques – but instead, we’ll refer you to this video cataloguing the hot water bottle hash method.
In a nutshell, you need to place your kief (or dry sift) inside a packet of parchment paper or heat-safe plastic wrap (like a turkey roasting bag), then apply heat and pressure using a wine bottle or mason jar filled with water that’s just under boiling temperature.
Slowly apply pressure and heat by rolling your bottle or jar over the packet of kief – you’ll eventually start to break down and melt the trichomes. Keep in mind that the purer your starting material, the better hash you’ll produce.
Keep at this process until you see the kief start to darken, melt, and fuse together – eventually, you should get a sticky, resinous, and fragrant compound that you can then roll into a ball or tube by hand. The pressing and heating process may take up to 30-40 minutes, but make sure to regularly pull apart your parchment or plastic to check on it – some purer kiefs can be ready in as little as 15 minutes.
You’ll know it’s done when it’s gone from powdery kief to a uniform, sticky substance. Rolling this hash into a ball helps it cure and preserve the terpenes, creating what’s known as a temple ball. Just like wine, temple balls improve with age – consider stashing one in a cool dark place for several months or even a year, and you’ll be blown away by the flavor once you crack it open.
How to Make Bubble Hash: Or How to Make Ice Water Hash

The method for making bubble hash (also called ice water hash) is very similar to the dry ice method, but uses ice water instead of dry ice. Many hashmakers prefer making bubble hash to making dry ice hash, as it’s believed to produce stronger effects (or highs) when smoked or ingested.
Bubble hash is great because it requires minimal equipment (if you’re doing it manually) and doesn’t use any chemicals whatsoever – just water, ice and cannabis. However, it’s more labor-intensive than some of the other methods on this list.
You’ll notice a lot of overlap with the equipment needed for dry ice hash, so if you bought some of that stuff, you’ll be able to try both easily. Here’s what you’ll need to get started making bubble hash:
- 2 5-gallon buckets
- 2 large bags of ice
- A set of bubble hash bags (a full set is overkill – 4 bags ranging from 25 to 220 microns will do the trick)
- A metal tablespoon (for collecting)
- A sink with a sprayer, or a spray bottle – or even just a glass of water
- A hand mixer, or a large wooden spoon (for mixing the water)
- A drying screen, usually 25 micron
- Some paper towels
- Trim or ground bud
Now that you’ve got your materials ready, let’s learn how to make bubble hash:
- Place your 25 micron drying screen on top of a few layers of paper towel and set aside.
- Put your 220 micron bag into one of the buckets and secure it to the rim.
- Add ice and ground cannabis in alternating layers to your bucket. The top and bottom layers should be ice. Once you’ve layered them, add just enough water to make the top layer of ice float.
- Let it sit – the trichomes are getting cold and brittle, enabling them to separate easily from the plant matter. Leave it for 20-25 minutes before you continue. Time to pack a bowl 😉
- Time to mix it up. If you’re doing it manually, just stir your hash water consistently with the large wooden spoon. You can also make it a bit easier on your arms by using a hand mixer, like you’d use for baking. Note that when using a hand mixer, it probably won’t reach all the way to the bottom of the bucket – make sure to periodically stop mixing, stir up all the sediment from the bottom, then continue. You should mix for about 10 minutes total. Once you’re done mixing, let it sit another 10 minutes to let everything settle.
- It’s time to remove the 220 micron bag – pull it carefully off the rim, gather the edges together, and slowly lift it out of the bucket. Let all of the water fall through, back into the original bucket. Squeeze it to get the last bits of water out, then set aside the plant material. Don’t throw it away – we’ll be using it later.
- Set up the remaining hash bags in your second bucket. You’re going to layer them with the smallest micron size on the bottom and the largest size on the top – meaning put in your 25 micron first, then the 73, then the 160. This will allow your hash water to filter through, with each bag collecting a bit more plant material and impurities, leaving your top-grade hash in the bottom bag.
- Carefully pour the hash water from the original bucket into the second bucket after the hash bags have been installed. If there’s anything stuck to the sides of your original bucket, you can just spray or pour a little water in to loosen them up, then pour that into the second bucket as well.
- Let the water drain through, then detach and lift the first bag. Once drained, attach this bag to the rim of the first, now-empty, bucket. Pull it gently down the sides until the center of the bag is pulled almost taut across the bucket opening. You’ll see some sediment collected in the micron screen portion of the bag. Guess what that is – that’s right, you’re about to collect some hash! Spray or pour some water to encourage the hash to collect in the center of the bag.
- Scrape the hash out of the bag with your spoon and deposit onto the drying screen you set aside back in step 1. Consider putting a little label next to the hash with the micron size of the bag it was pulled from, so you know which grade of hash is which.
- Repeat steps 9 and 10 for the remaining two hash bags, collecting the hash from each and depositing in separate piles on the drying screen. We definitely recommend keeping them separate so you can enjoy your finest-grade hash on its own.
- Remember the plant material we set aside back in step 6? Go grab it – we’re repeating the entire process again. Start all the way over at step 2 and repeat the entire process with the same material again. While this isn’t absolutely necessary, you can often get close to double the yield by repeating. If you’re feeling lazy and don’t mind losing about 50% of your yield, you can finish at step 11.
- With both runs complete, use your spoon, or a scraper, to break up the hash into tiny pieces – about half the size of a grain of rice is good, but the smaller the better. This step is super important – first of all, it’ll dry out faster, which means you can get to smoking it ASAP, and it will also prevent mold or fungus from growing as it dries.
You just made your very own bubble hash! After it’s dried, which should take 1-2 days, you’re ready to enjoy it on top of a bowl or in a joint. Remember – bubble hash is super potent, so start with a small amount.
How to Make Dry Sift Hash

Dry sift hash is kind of like super-kief. It’s made just by sifting plant material, and doesn’t require any drying time like bubble hash, or special compounds like the dry ice method. All you need is some sifting screens, some starter material (ground bud or trim) and a smooth, flat surface to collect your sift on.
If you’ve got a grinder or stash box with a mesh screen in it, one that collects kief, you’ve (kind of) already made dry sift. The principle is the same – you sift ground cannabis over a screen, which is fine enough to allow only the trichomes to fall through.
You can use a sifting screen set, composed of several different grades of screen, to create super-fine dry sift hash. Or you can just use one screen to produce slightly lower-grade hash.
The process couldn’t be more easy – just place your plant material in the screen, and shake and sift over a smooth surface until you don’t see any more trichome powder falling out. Repeat with finer screens if desired. Then, just scrape up the hash that fell out and store in a container. You can even process this sift further using the Frenchy Cannoli hot water bottle method, mentioned above.
How to Make Hash Rosin

So now you’ve tried 5 different methods of making hash, and you’re running out of ideas. You’ve smoked bowls, you’ve rolled some delicious hash joints, maybe you even tried cooking with hash. There’s still something else you can do with your hash – press it into rosin.
If you’re into dabbing (smoking concentrates with a dab rig), you probably prefer solvent concentrates like shatter and wax, because they melt completely and won’t leave any residue in your rig. But what if you could combine the texture and potency of concentrates with the flavor of solventless hash?
Hash rosin is the answer.
Typically made with dry ice or bubble hash (or even kief!), hash rosin is created by pressing hash between two heated pressure plates until it liquifies and runs out. This is typically done with a rosin press machine, but you can use a hair straightener (to mixed results) if you’re on a budget.
Essentially what you do is put your starting material (hash, or even flower if it’s moist enough) in a small bag made of micron screen material – the same type of screens found on the bucket bags we used earlier, but in the shape of a small pocket or envelope. This packet is then placed into a rosin press and gently heated and squished until a resinous substance starts oozing out. That substance is collected and cured at room temperature for a couple of days, and the result is what we call hash rosin.
Considered by many connoisseurs to be the finest extract available on the market today, hash rosin is delicious, solventless, and dabbable – more than can be said for many other forms of hash or even solvent extracts.
How to Smoke Hash
Now that you’ve made all of these delicious varieties of hash, let’s find out how to enjoy them. We’ll break down each type of hash and how they might be best used:
- Finger hash/charas: An old-school hash deserves to be enjoyed the old-school way. Just roll it into a joint with some tobacco or weed, or place a few small pieces on top of a bowl in a pipe or bong.
- Dry ice hash: It can definitely be enjoyed on its own in a joint or a bowl, or may be dabbable if you used a fine enough micron screen. Consider pressing it into rosin for dabbing, or decarbing for edibles.
- Kief hash: Treat it similar to dry ice hash – enjoy by itself, make edibles, or press rosin.
- Bubble hash: Definitely enjoy this one on its own – we recommend trying at least one bowl with nothing but bubble hash in it. The flavor and potency are second to none.
- Hash rosin: Hash rosin is made for dabbing. It’s the best type of solventless extract to enjoy in your dab rig, but it can also be added to joints or bowls for a super potent smoke.
One last thing to remember: weed was made to be shared. If you’ve just finished harvesting a ton of hash, thanks to our expert guidance, you gotta make sure to share with your friends who will enjoy it. 🙂


In This Article